|
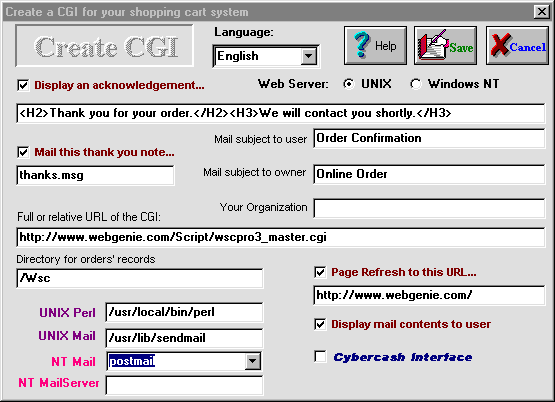
This module builds the order processing CGI. Only
active in the registered version. You will, however, be able to test the
entire functionality of the carts using the WebGenie server to run the CGIs.
The latter option is available to both registered and evaluating users.
The first two radio buttons
determine which webserver type. Select UNIX for any version of UNIX webserver,
including Linux. The Windows NT button must be checked for NT or MS IIS
servers.
Please note: Only the
registered version will create a CGI for your server, and the use of CGI off
our server incurs a subscription fee after the initial 3 months after
registration.

Video Tutorial
Click this link to view a visual demonstration of the program. Your
browser must be Java and JavaScript enabled and these options must be turned
on.
Text Tutorial:
Start the program via Start...|Programs|WebGenie
Software|WebGenie ShoppingCart Professional
-
Click 'Create CGI'
-
Check the webserver type (Choose UNIX for all versions of
UNIX including Linux. NT for all versions of NT and MS IIS servers).
-
Select the language from the dropdown list. The
CGI-generated text will be displayed in the selected language.
-
Display an Acknowledgment - check this
button to show the message (typed into the box below it) after the order
has been sent. Uncheck and blank the text to go directly to a refresh page
(shown under 'Page refresh to this URL...')
-
Mail this thank you note... - Type the
filename (plain text) into the box below it. The contents of this file
will be mailed to the customer on submitting the order. This file must be
placed in the same directory with the CGI or its UNIX pathname must be
given (e.g. /home/users/text/message.txt or ../text/message.txt)
-
Full or relative URL of the CGI - Type in
the web address of the CGI or its relative URL. e.g. http://www.yourdomain.com/cgi-bin/shopcart.cgi
or /cgi-bin/shopcart.cgi This must be the same filename
(case-sensitive) given for the CGI to be created.
-
Directory for orders records - This is where
the order details are recorded (less the credit card details unless opted
for that as well). The default string, '/Wsc', means this directory will
be created in the HTML document root. Though the record files in here will
not normally be visible to anyone on the Internet, for added safety you
can specify the full UNIX pathname of a directory higher up.
-
UNIX Perl - the pathname for the perl
program on the UNIX webserver. Normally this is /usr/local/bin/perl
but can be any of the following. Ask your system administrator for the
exact pathname if the default address does not work.
-
/usr/bin/perl
-
/bin/perl
-
/usr/sbin/perl
-
UNIX Mail - the pathname for
the sendmail program on the UNIX webserver. Normally this is /usr/lib/sendmail
but can be any of the following. Ask your system administrator for the
exact pathname if the default address does not work.
-
/usr/bin/sendmail
-
/bin/sendmail
-
/usr/sbin/sendmail
-
NT Mail - Select the NT mailer on your
server. Only postmail, blat and windmail are supported. One of these must
be installed in the Windows' directory.
-
NT Mail Server - Specify this if your own
webserver does not have a mail server program (SMTP server) running. Must
ask your system administrator for advice.
-
Page refresh to this URL... - Specify the
full or relative URL of the page to go to after submitting the order.
Note: If the Acknowledgment button has been
checked there will be a 5 second delay before going to the refresh page.
-
Display mail contents to user - Check this
if you want the customer to see the contents of the order sent to you. For
safety, you can mask the value of any form field by inserting the
character, #, in front of its ID. e.g. '#Card Number' will display to the
user as... '#Card number - Given' but will send the actual value of the
input to you in the mail.
Cybercash Interface - Check this if you
have cybercash payment gateway. The shopcart.cgi should reside in the same
directory as the cybercash CGI. If not, a minor change in the shopcart.cgi
must be done manually. We can help you with that. -
Click 'Save' and give a filename for the CGI. This
should be the same filename given in the 'URL of CGI' field.
-
Transfer the CGI file to the webserver. You may have to
place the CGI in /cgi-bin to be functional.
-
If UNIX webserver, give the command, 'chmod 755
filename'
to set the correct protection on the CGI. This can sometimes be easily
done via the FTP utility used for transferring the file.
How to
Customize Your CGI-generated Pages
|